
How to Use Cricut Autopress for DIY Projects?

Crafting is undoubtedly fun. When your crafting skills are paired with a perfect machine, all you get is an outstanding project. Have you been crafting for a long time? Do you love experimenting with new projects? Here, I will tell you how to use Cricut Autopress based on my experience. Thus, you will find joy in creating projects. Last time, I was making a T-shirt for a team retreat, and I felt thrilled working with this Cricut machine. I also loved to print custom designs on fabric and wooden surfaces. In this write-up, I will explain everything, all the valuable tips and tricks about using this totally redesigned heat press.

If you are excited about going through every step of using this incredible Cricut machine, you can find it helpful. Since I have done many more projects, I will explain my experience here. But, before talking about it, let us understand the machine first.
What is Cricut Autopress and What’s Special About It?
It is obvious for a crafter to be curious about the Cricut machines and their functions. Thus, if crafting is your hobby, like me, get to know the machine here. Autopress is a traditional heat press that you can use to craft a broad range of flat blanks. The machine works excellently for creating coasters, T-shirts, tote bags, wooden signs, etc. The machine easily adheres to sublimation prints, iron-on vinyl, and Cricut infusible ink. In addition, it comes with several new features that make it special among other heat press machines.
- Autopress automatically adjusts pressure.
- A preset option is available for creating projects in bulk.
- The hand-free option enables you to do other activities.
- Different tools are available for different project needs.
- Multitasking feature, especially in a small/multipurpose space.
With all these features, Cricut Autopress is easy to set up and use. I am amazed at its safety features.
Setting Up a New Cricut Autopress
I found my shipping box approximately 58 lbs. Since it was a bit heavy for me, I asked my sister to help me lift it. Once I found a proper palace, I unboxed the box. Below, I am sharing some simple steps to set up the machine. You will need to go with this process before learning how to use Cricut Autopress.
- Firstly, use the USB cord to connect the Autopress to your system.
- Now, go to Cricut Setup.
- Afterward, perform all the on-screen guidelines to set up.
- Alternatively, go to Cricut Design Space.
- Then, select the New Product Setup option.
Note: If you don’t have a standard USB drive, you will need to buy a USB to USB-C converter.
How to Use Cricut Autopress for the First Time?
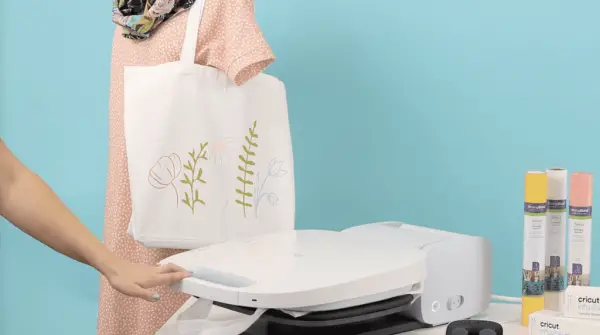
If you are excited about making print designs, Autopress is the best option. I have completed my favorite designs on several wooden and fabric surfaces. Here, we will share everything to help you get started with this machine. Before you get into the steps, make sure to have an Autopress, Cricut, weeding tool, and Standard grip mat.
- First, go to Cricut Design Space and tap on Upload Image.
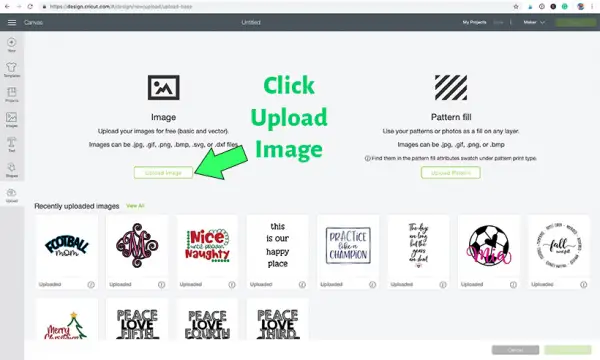
- After that, click the browser to discover your file.
- In the next step, adjust the design dimension depending on your needs.
- Now, remove the clear liner from your Cricut mat.
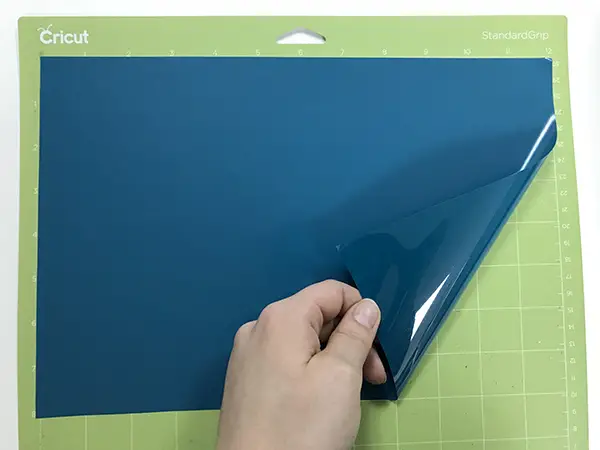
- Then, insert the mat into your machine and hit the Load button.
- Afterward, click on the Play button to start cutting.
- Now, find your Wedding tool and peel unwanted pieces.
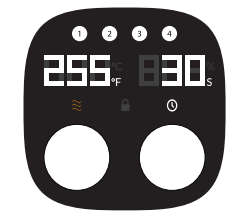
- Thereafter, adjust the temperature and time based on the material.
- Then, preheat the base material to remove moisture.
- Now, place the material onto the machine’s plate.
- After that, keep your design on the top and arrange it.
- Then, verify the proper temperature and time in the Control Pod.
- Press down the handle of your machine until it locks appropriately.
- In the end, remove the carrier sheet.

Once you remove the carrier sheet, your complete design will come out. Thus, next time you want to try out some projects, go along with these steps. After you learn how to use a Cricut Autopress machine properly, you can start making numerous projects.
Conclusion
Crafting becomes fun when you have a suitable set of materials, skills, and the machine to get started. If you are a hobby crafter or small business owner, you can find Autopress helpful in creating several handmade projects. The machine features several tools and automatic presets to make crafting convenient. Moreover, it is easy to learn how to use Cricut Autopress and create the first project. So, next time, surprise your loved ones with fantastic DIY projects.
Frequently Asked Questions
Q.1 Is Cricut Autopress Best for Beginners?
Autopress is an excellent machine for all levels of crafting. Therefore, whether you are a beginner or experienced, you can use it to create a DIy project. Beginners can save their time, and pro crafters can speed up their printing process. One of the best things about this machine is that it creates projects fast. So, it is the best for projects with limited time.
Q.2 What is the Control Pad in Cricut Autopress?
Control pad dials are used to adjust the temperature and time in the machine. It allows an easy way to set the needed time and temperature for your project. Follow the steps below to set them in your Autopres machine.
● Switch on the left dial to adjust the temperature as per your material.
● Turn on the right dial to set the timer.
Q.3 What are the Basic Steps of Using Cricut Autopress and Making Crafts?
Do you need to learn how to use Cricut Autopress? If you have purchased a new machine, you will need to go through these steps.
- First, unbox your machine.
- Next, find the included USB cord.
- Then, connect your machine to the computer using a USB cord.
- Thereafter, move to Cricut Setup.
- Now, perform all the prompts for a complete setup.
- Lastly, start creating your projects.
Visit: cricut create connect to computer
Source: https://cricuts-mart.com/how-to-use-cricut-autopress-for-diy-projects


Comments
Post a Comment